Wednesday, August 17, 2011

DIY Kayak Fish Finder Install - 2012 Wilderness Systems Ride 135

Last week I published details on how I built a pivoting transducer arm that makes use of the existing rudder screw holes in the rear of the 2012 Ride 135.  Since then, I have received quite a few requests for a write-up on how I completed the entire fish finder install.   These instructions are pretty universal so no matter what you are paddling, the fundamentals are pretty much the same.


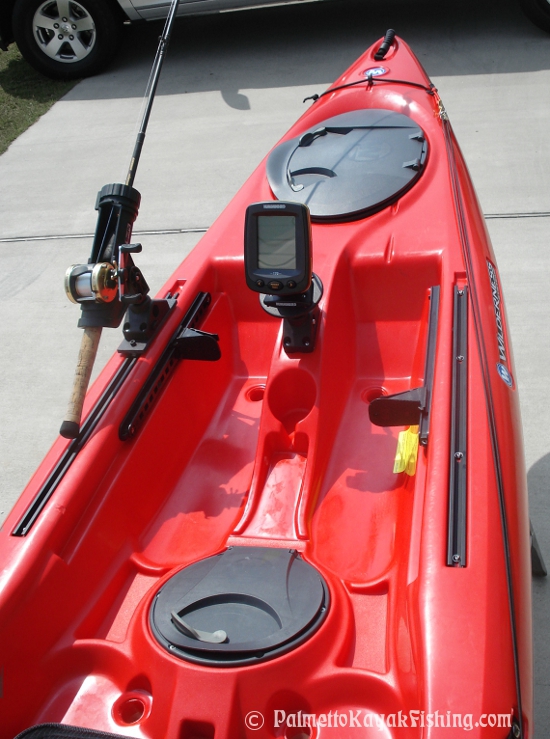
I chose a basic waterproof fish finder – Humminbird’s Piranhamax 170 – that can be purchased for around $100.  What I like about the Piranhamax 170 is that it is simple, accurate, boasts a digital temperature gauge and has a vibrant LED backlight for low light/no light conditions.  It utilizes dual beam sonar (60°& 20°) which produces great results in both the shallow and deep water that I regularly fish.  My only gripe is that I wish the unit had a digital voltage display like my old Eagle Cuda. 


Since I already had a few extra Scotty 241 bases left over, I decided to save some money and build a mounting post with some items I had laying around in the garage.  The main components total around $3-$4 and include:

1 - 4.00" Round Plastic Electrical Box Cover – Lowes Item # 81585 (LINK)

1  - 1½” long, ¼’ diameter bolts (or something similar) 

1 – Stop Nut to fit bolt

1 – ½” Schedule 40 PVC Coupling – Lowes Item # 23849 (LINK

1 – ½” Schedule 40 PVC Pressure Plug - Lowes Item # 22679 (LINK)

1 length of schedule 40 PVC cut to 2-3/8” 

Fish Finder Mounting Base 


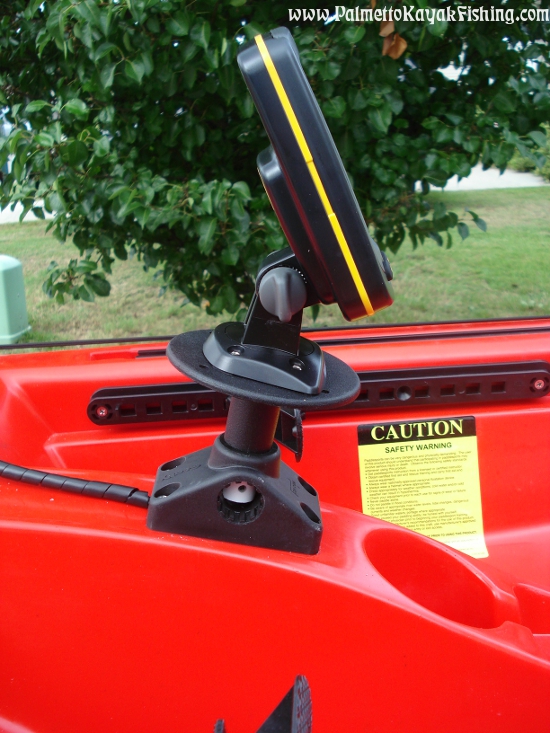
Drill a hole in the center of the round electrical box cover and one through the center of the PVC pressure plug.  Slide the bolt and nut into place as pictured and tighten up the whole assemble.  Using PVC glue, attach the PVC coupling to the end of the PVC pressure plug.  Take the 2-3/8” section of PVC and glue it inside the coupling.  The exposed length of ½” PVC pipe is what will hold the unit firmly inside the standard Scotty mount.  I drilled an additional hole at the bottom of the PVC so that when the unit is inside the Scotty mount, I can slide a bolt or pin through it for added security.


(***To dress it up a little, I sprayed it with a can of “Truck Bed Liner” left over from another project.  If you go this route, be sure to mask off the bottom section of exposed PVC so that it will still be able to fit inside the Scotty Mount.)


I used the stainless steel screws that came with the fish finder to mount it to the plate.  Once in position, I smoothed off the points of screws so that they were flush with the round plate using a Dremel tool.


Installing the Unit 

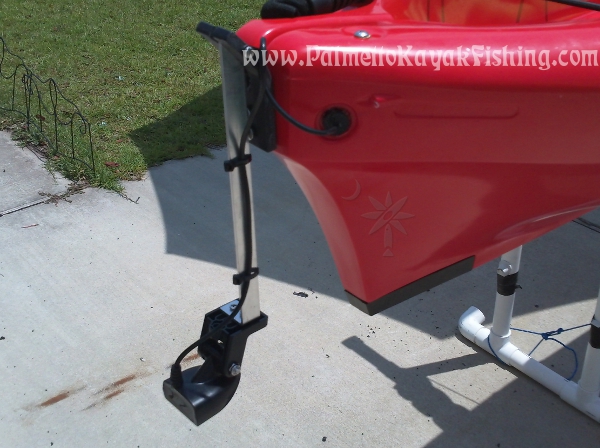
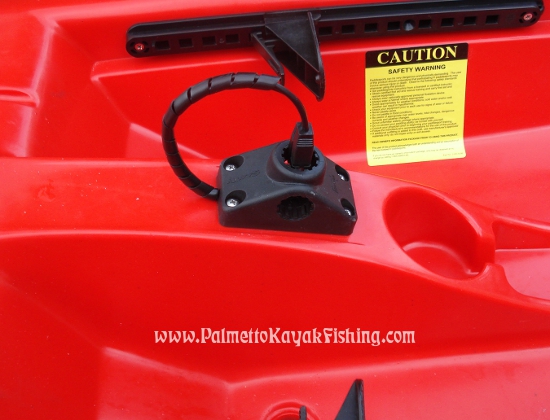
I used the Dremel tool to bore out the underside of the Scotty mount to make more space for the transducer and power cords (see picture).  Once this was completed, I placed the Scotty mount in position on the deck and drilled out 4 holes for the mounting screws.  Next, I selected a drill bit that would create a hole large enough in the center area of the 4 mounting screw holes to allow the wires and plugs to pass through the kayak deck.


Using a rubber stopper - 3/4 x 9/16 x 1 Lowes Item # 139548 (LINK) – I drilled, shaped and cut the rubber as pictured.  Again, there are commercially available marine accessories that accomplish the same thing, but I had an extra rubber stopper from the transducer arm install so I decided to put it to use.


Leave 12” of slack in both wires from the rubber stopper to the end of the wire plugs.  Remove the rubber stopper while holding the wires in position to maintain the 12” of slack.  Generously coat the entire rubber stopper and both wires with Marine Goop.  Push everything back into position and add a small amount of goop to the 4 mounting holes as pictured.   Carefully mount the Scotty mount to the deck ensuring that there is enough space for the wires to pass through without any pinching.


Click for Transducer Arm DIY instructions

Click for Transducer Arm DIY instructions


The next blog post will feature a DIY removable battery box setup that I use to power this unit.  Have fun out there! - Paul

Wednesday, August 10, 2011

Palmetto Kayak Fishing Facebook Challenge - win free gear!


So here is the challenge.  We are currently at 318 fans on our Facebook page.  Help us get the Palmetto Kayak Fishing Facebook fan page up to 400 "Likes" and we will reward one lucky fan with a nice prize pack valued at over $75.

Tell your friends about us, send out a simple post on your own Facebook page, tweet it - it is that easy. Once we hit the 400 mark I'll do a random drawing for one of PKF's 5' fiberglass Stake Out Poles as well as a PKF Fiberglass Floating 5 LED Light Stick package shipped anywhere in the US.  Thanks for your support and good luck! - Paul


Tuesday, August 9, 2011

DIY Kayak Transducer Arm for the 2012 Wilderness Systems Ride 135


I have received a lot of questions on how I fabricated the rear transducer arm for my 2012 Ride 135.  There are a few elements I may update with this setup in the future, but I really like the way it works as-is.    In the past I have used transducer arms that hang over the side of the kayak (like this DIY removable fish finder project) or installed the transducer so that it fires through the hull.  This new setup accomplishes a couple things:  1) water temperature is accurately measured and 2) the transducer is protected, out of the way and creates minimal drag.  Having the ability to rotate it up and out of the way also makes things easy during transport.


Shopping list:

Poly Cutting Board (Walmart, Target, etc.)

Aluminum Flat 1/8 x 3/4 x 3'  (LINK)

1 Rubber Stopper 3/4 x 9/16 x 1 Lowes Item # 139548 (LINK)

Package of ¼-20 x ¾ SS Oval Head Machine Screws for mounting assembly to existing rudder holes – Lowes Item #136337  (LINK)

Package of 8-32 x 2 SS machine screws Lowes Item # 136468 (LINK)

Package of 8-32 Stainless Steel Forged Wing Nuts Lowes Item # 136212  (LINK)

Zip Ties, Marine Goop

(Note:  Some of the Lowe's links may display "product not available online" but they are regularly stocked in all the local stores)

Step 1
Cut out a 4” X 1.5” rectangle from the poly cutting board.   As pictured, cut an additional slot in the center of the 1.5” side at the ¾” mark that is 2.5” in length as depicted in the photos.  Make sure the slit is wide enough to accommodate the width of the aluminum flat stock.   


Step 2
While wearing thick leather work gloves, use a heat gun to bring the poly rectangle up to temperature, focusing on the slotted end.  Once the poly rectangle is pliable, secure it in a vice and bend by hand until it looks similar to the one in the pictures.  Hold it in the curved position until the poly cools.


Step 3
Using a vice, make a 90 degree bend in the aluminum stock that will accommodate a proper mounting point for your transducer.  Cut the stock to 10” in length above this bend. 


Step 4
Line up the poly rectangle on the stern of the kayak where the preinstalled rudder mounting holes are located.  Mark and drill the holes in the poly rectangle and use the ¾” SS Oval head bolts to temporarily mount the unit to the kayak as pictured.  Slide the aluminum flat stock arm into the slit in the poly and position the arm so that it is vertical.  Note that the aluminum arm will rest against the 2 mounting bolts that hold the poly to the kayak. 


Mark and drill a hole starting on one side of the poly cutting board, continuing through the aluminum arm and back out the other side of the cutting board that will accept the 8-32 x 2 SS machine screw.   Slide the bolt into position and tighten the wing nut, creating a pivot point for the arm.  Clean up the aluminum arm with a grinder making sure to round off all sharp edges.

Step 5
Remove the factory installed drain plug from the rear portion of the kayak and feed the transducer cable into the hull.  Drill a hole through the rubber stopper that is the same size as the transducer cable.  Using a razor blade, cut a slit into the stopper until it meets the hole that was just drilled.  This will allow the cable to slide into the stopper as pictured.   Place a liberal amount of Marine Goop on the stopper, transducer cable and drain hole and slide the stopper snugly into place.  Allow it to dry and ensure that you have a watertight and secure seal.


Step 6
Mount the transducer to the arm and secure the cable with zip ties or similar method.  I used some of the hardware that came with my fish finder to route the cable from the rubber stopper to the aluminum arm.  That’s pretty much it!- Paul


Friday, August 5, 2011

2012 Wilderness Systems Ride 135 Review


The redesigned 2012 Wilderness Systems Ride 135 delivers a remarkable fishing platform in a well thought out package.  Mine came in on Tuesday from Austin Canoe & Kayak and I spent the afternoon rigging it up for fishing.  I added a few basic items like an anchor trolley, Scotty mount rod holders, fish finder, custom transducer arm and some homemade Slidetrax accessory plates.  Rigging a new kayak from the ground up is one of my favorite hobbies and each time I seem to find a better way to do a few things. 


The center hatch was damaged during shipping, but Austin Canoe & Kayak took care of it immediately.  Thirty minutes after the call, I had a FedEx tracking number and the new hatch was on its way.  The sense of urgency that that the ACK customer service reps took with this issue was impeccable.  Accidents happen - it’s all about how a company responds to a problem.  I’ll be the first to say that ACK embodies true customer service.                     

Other companies/industries in our weak economy should definitely take note.  In the meantime, I “borrowed” the center hatch from my girlfriend’s Tarpon 140 and replaced my broken unit with it until the new one is delivered.  


On Wednesday I loaded up the Ride and took it out to a local pond for the first test paddle.  I was amazed - literally amazed by how well this kayak performed.  I’m 6’8”, 240lbs and not only is the 2012 Ride 135 incredibly comfortable, there is room to spare.  It is dry, gets up to speed quite easily and tracks well.  For its large stature, it is surprisingly easy to paddle and control.  So well in fact, that I don’t think it should be categorized as just another “big guy’s kayak”.  I have no doubt that my much smaller girlfriend could paddle this yak with ease.  In addition, the fly fishing crowd is probably going to appreciate a lot of the styling cues that this yak has to offer.


Granted, the new Ride 135 is a little on the heavy side but so are the majority of other fishing kayaks in this class.   When loading the kayak on the roof rack or carting it down to the water using my Bulletproof DIY Cart, I don’t notice any significant weight difference from that of my previous big man’s fishing kayak that the Ride 135 is replacing.  


The seating system coupled with the floor layout is genius.  In other kayaks I have owned, I run into a common problem - there never seems to be enough leg room for me from the seat to the foot pegs.  I have historically had to modify the design of the foot pegs to make my legs more comfortable, but the Ride’s configuration worked perfectly right out of the box.  


The amount of flat floor space on the deck of the new Ride 135 just begs the kayak angler to stand up and fish.   Combine this feature with the super stable pontoon-style hull design and a whole new standard in fishing kayaks is born.  Even with the wind blowing at a good clip, I wasn’t even remotely concerned about stability while standing for the first time.  Transitioning from a standing position back into the seat – a topic that is rarely discussed yet is equally as important- was effortless.


Another nice touch is the sliding seat system.  The robust seat is very comfortable and has multiple adjustment points that allow for a tailored fit.  Back support is also more than sufficient.  Changing the position of the seat works much like a manually adjustable seat in a car and is surprisingly smooth.  This arrangement allows the paddler to adjust his weight over the deck of the kayak, giving the user control over how the yak sits in the water.  I tend to carry quite a bit of gear in my kayak crate so having this option will be a welcomed change when I am out fishing.   It is also worthy to note that the seat can be removed completely which opens up a lot of doors for custom configurations.  Given the stability of this kayak, an aftermarket “high seat” would be very feasible. 


So in a nutshell, I couldn’t be more pleased with the new 2012 Ride 135.  A lot more details and how-to rigging ideas coming soon!  - Paul


          Thanks for reading and be sure to visit our online store at www.PalmettoKayakFishing.com


                                              2012 Wilderness Systems Ride 135 Pictures
                                                             2012 Ride 135 Rigged


My custom built transducer mounting system - more on this later!

My custom built transducer mounting system - more on this later!

My custom built transducer mounting system - more on this later!

My custom built transducer mounting system - more on this later!