
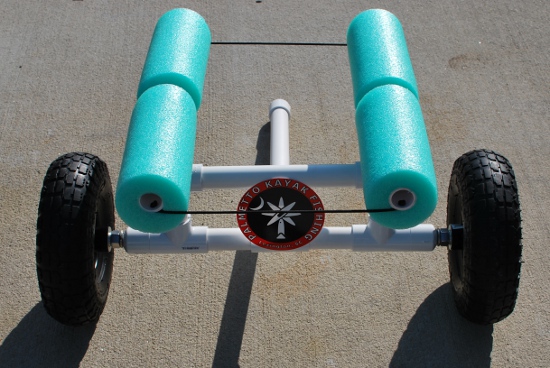
I carry quite a bit of gear when I go fishing and when one factors in the weight of my Ocean Kayak Prowler Big Game, the 12 volt Werker fish finder battery and various other gear, I’m at or above the 100 pound mark. I have been using this cart design for over 2 years and it has yet to fail me or damage my kayak. While some elements of this cart may look familiar, there are a few tweaks that I came up with that make it super strong and functional. It is at home on rough terrain and really makes transporting a heavy kayak an easy process. For the budget-minded kayak fisherman, this cart is relatively inexpensive and built to handle whatever you throw at it. Here’s how I built it.
SHOPPING LIST:
Home Depot or Lowes
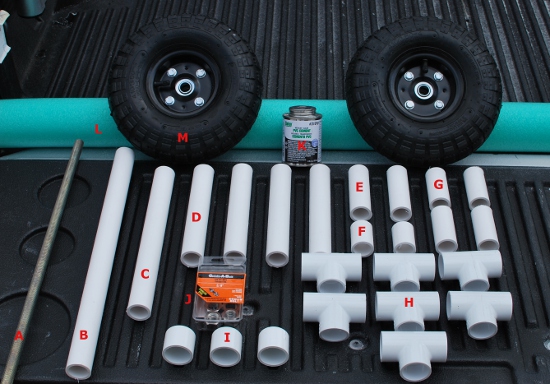
3 foot section of 5/8” threaded rod ($4 – item “A” in picture below) – NOTE: it will be cut down to 25.5”
10’ Section of 1” diameter Schedule 40 PVC pipe ($3)
PVC Glue ($3 – item “K”)
7 – 1” PVC Tee fittings ($3.50 total – items “H”)
3 – 1” PVC Caps ($1.20 total – items “I”)
5/8” “Create-A-Bolt” stainless steel nuts, washers and lock washers kit ($3.80 Home Depot Item “J”)
 |
| "5/8" Create-A-Bolt" |
Walmart
JUMBO pool noodle ($3.88 – item “L”)
Harbor Freight
2 – 10” pneumatic wheels/tires (LINK)– frequently on sale for $5.99, used a 20% off coupon always available HERE or in magazines & weekly mail fliers. (TOTAL for 2 tires $10 – Items “M”)
TOTAL COST = Around $33
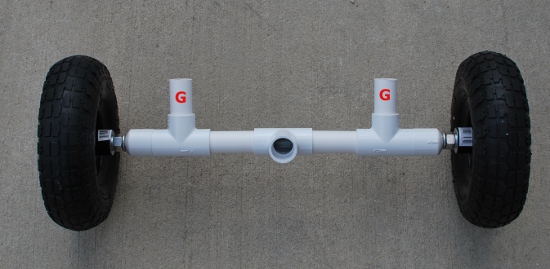
Step 1 – Cut the 10’ section of 1” PVC into the following lengths. Your LAST cut should be the piece of PVC labeled as “C” in the picture above. After the lower assembly is fitted together, double check the measurement to make sure that “C” which was 10.5” is the correct length.
(B) – 18”
(C) – 10.5”
(D) – cut four 8” pieces
(E) – cut two 4.5” pieces
(F) – cut two 1¾” pieces
(G) – cut four 3” pieces
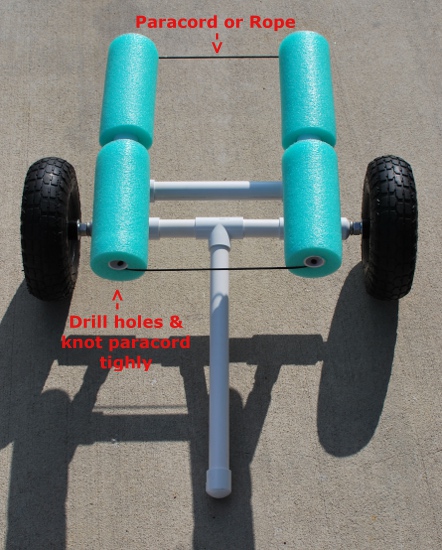
Step 2 – Drill a 5/8” hole through two of the PVC end caps.

Assemble the lower unit pieces together as pictured below. I don’t use any glue here because the way I attach the threaded rod holds the entire assembly together just fine. Just to recap, “F” is 1¾” long and “E” is 4.5”.
 |
| No Glue Needed |
 |
| Assembled |
 | ||||
| Side View |
Step 3 – slide the threaded rod through the entire lower portion. Test fit the lock washer and nuts as seen in the picture below, put the wheels on and screw the outer bolts on as well. I cut the rod at 25.5”, but make sure this works for you before you cut. Tighten the inner nuts and lock washers down and the PVC will not budge.


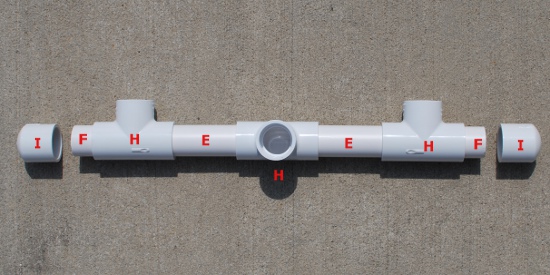
Step 4 – Assemble the following pieces as seen below and glue where noted.


Step 5 – Assemble and glue the top support sections that the pool noodles will be fitted to.


Step 6 – Glue the end cap to the handle section. Before sliding on the pool noodles that are cut to fit over the supports, drill holes in each of the 4 ends of the supports as seen below. Slide the pool noodle over the supports and then tie in the paracord or rope as pictured. This is an important step as it will keep both supports facing the same way during the loading/unloading process.

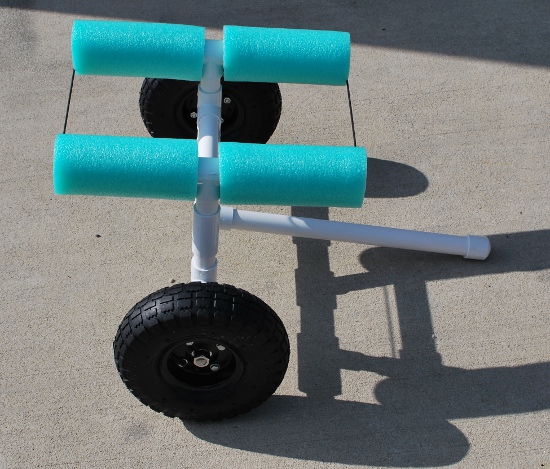
That’s pretty much it. I use the handle as a push rod to get the cart in position under the yak. I use on hand to lift the back handle of the kayak and the other to slide the cart into place. It can also be used as a “kickstand” and the yak can be placed on top of it. A 13’ strap holds it in place nicely.


The whole assembly breaks down in seconds and fits nicely inside the front hatch. I only have to remove one wheel and the pool noodle covered supports to make it fit. Save some money and build one yourself!


Thanks for reading and be sure to visit our online store at www.PalmettoKayakFishing.com