Monday, January 31, 2011

DIY Scotty Flush Mount Adapter

Be sure to visit our online store at www.PalmettoKayakFishing.com

 A friend of mine asked me to help him come up with a rod holder adapter that would fit into the vertical/angled flush mounted holders that came on his Grady White. When down-lining live herring, you want to be able to put out a lot of rods and have them situated perpendicular to the water, not pointing towards the sky. I know of a few manufacturers that make flush mount adapters like this complete package from Cabela’s but at $40 a pop plus shipping, it quickly gets expensive for 4 sets.

While test fitting some parts to come up with an option for Casey, I realized that I could use something like this on my kayak. When I am trolling, I typically put two rods in my flush mounted rod holders that are behind me. They face to the rear of the kayak at an angle. I can’t tell you how many nice stripers I have watched pop off the hook 100 yards back because I didn't immediately notice the strike; it is enough to make a preacher cuss.

Moving on, maybe I was a plumber in my past life, I don’t know, but I build just about everything out of PVC. It’s cheap, strong, easy to work with and readily available at almost every hardware store. I’ve built racks, carts, potato guns and even a portable beer pong table out of the stuff.  Someone once told me that PVC parts are like grown man lincoln logs – that is about right I suppose.

So here is what I came up with for my kayak. This design could be slightly modified to work on just about any boat with flush mounted rod holders. When you buy the Scotty rod holders, they come with the non-flush base that is pictured. I have a drawer full of these because I like the aftermarket flush bases that allow for a cleaner install on the deck of the yak. These work perfectly for this build and I am glad I found a use for them. The kicker to building this extension is that it gets everything up and out of the way of the paddle stroke area yet still allows for easy rod access and visibility.
You’ll need a few parts from Lowes. If you are like me, you might have some of the stuff lying around in your shop. Here is a shopping list:

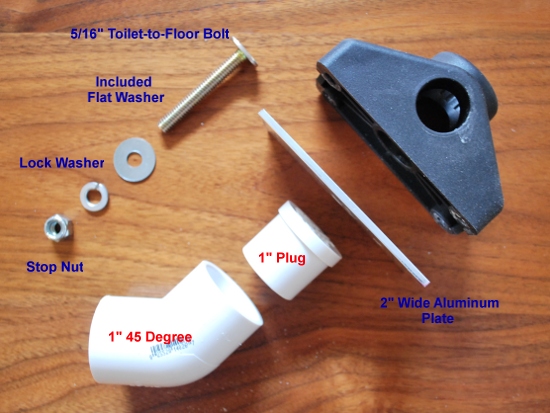
1” PVC pipe cut to size (mine design utilized 2 lengths of 7.5”)
1 – 1” PVC coupling
1 – 1” PVC 45 degree elbow
1 – 1” PVC plug
1 – 1” PVC cap
Package of Toilet-to-Floor bolts 5/16” (see picture, $1.97 at Lowes)
1 – 5/16” stop nut and 1 lock washer
1 – section of aluminum plate or wood to mount Scotty base to
4 - Mounting bolts, washers and nuts to attach Scotty mount to plate (I used 1” 10-32 bolts)
PVC glue
Paint or Rhino Liner Spray (optional)

Make the slit wide enough to fit over the gimbal pin inside of your flush mounted rod holder. This will allow the extension to “lock in” and not pivot under a load.  Start by cutting 2 notches into the PVC cap with a hack saw. Use a drill bit on the opposing sides of the cap where the saw lines end to remove the center piece of the PVC (see picture).

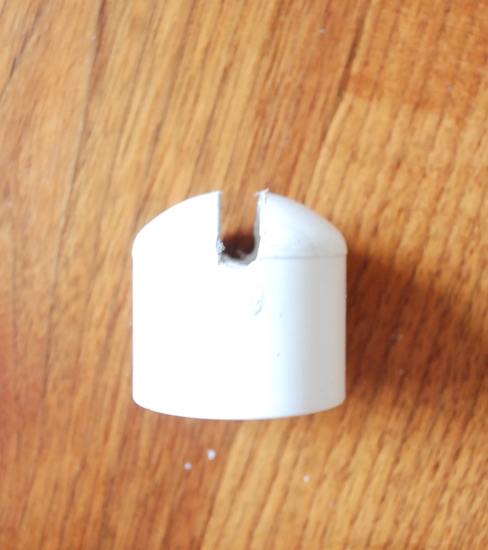
Assemble the PVC sections together as seen in the picture below. Slide this PVC unit into the rod holder making sure the slit in the cap fits over the gimbal pin inside the flush mounted rod holder. Rotate the assembly until the top plug is parallel to the deck of the kayak. Glue all the PVC pieces together, with the exception of the plug.


Cut a plate out of 2” wide aluminum (thin hardwood will work too) that will act as the pedestal to which the plastic Scotty base will attach to. Drill a hole big enough in the center of this plate to allow the toilet-to-floor bolt to pass through. The reason this type of bolt is used is because the head is flat enough to still allow the Scotty rod holder to fit into its base (see photos).


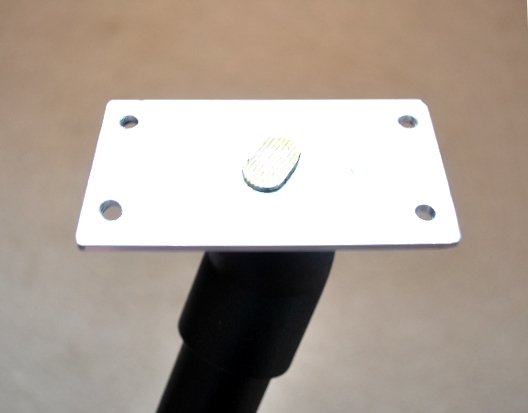
Drill another hole in the PVC plug and put the washer, lock washer and stop nut in place. Tighten the plate to the plug and use a hack saw to trim the end of the bolt if necessary (see picture to the left). Glue the plug into the rest of the PVC assembly making sure everything is flush and pointing in the proper direction.


Drill four holes in the aluminum pedestal and mount the Scotty base to it with the proper hardware. As noted before I used 1” 10-32 bolts with matching lock washers and nuts. I “Rhino Lined” my extension because I had some of the product in my shop – this is purely optional, but it looks great! I will report on how well this stuff holds up on PVC at a later date, but as of now I have had no issues with it. I am super pleased with how well this project turned out and will be building another assembly for the other rod holder. Tight lines.

- Paul


More Pictures


Be sure to visit our online store at www.PalmettoKayakFishing.com

Thursday, January 27, 2011

Saluda River - 1/27/2011 Fishing Report

If you are looking for nonstop action, head out to the lower Saluda River in Lexington, SC.  The rainbow trout that SCDNR stocked in the river are hungry!  In a few hours I was able to catch well over 20 of these little guys on light tackle from my kayak.  Paddle upstream from the James Metts Landing and fish the first set of rapids.  I was using Blue Fox's Whip Tail 1/8oz spinners on light tackle with 4lb test line. These trout seemed to favor the black/silver color combo as well as the orange.  The Blue Fox multi-pack (here is a link for what to look for) can be purchased at walmart for $6.

After fishing those rapids, I made my way upstream to the swift water near the spillway.  I saw a nice sized bald eagle on the paddle up, something I have grown accustom to seeing every time I am on that section of the river.  The largest rainbow that I caught came from this area, and although it only measured in at 12", he put on a show.  Here is a recap video of some of the action, available in 720p HD.


Note: Without trying to sound like someone's mother, it is important to remember that the Saluda, while beautiful, can turn ugly in just a few minutes.  Combine that with cold weather and 40 degree water temperatures and bad things can happen if you are not prepared.  If SCE&G starts lowering the lake (read all about it and check levels here), the water flow on this river can change drastically so always, always wear a lifejacket and the proper cold weather gear.  If the warning beacons go off or you notice the river level starting to rise, get back to the landing.  It is very manageable, just use your head.  

Check out the online store at www.PalmettoKayakFishing.com

Friday, January 21, 2011

Okuma Avenger Review

My garage is filled with different brands of rods and reels.  From bait casters, to spinning reels, to the old-school push button models that remind me of my younger (and skinnier) years, I have owned almost every notable brand.  So how is it that I have gone this long without trying out Okuma’s lineup?  Much like unicorns and leprechauns, the manufacturer Okuma successfully eluded my detection…that is until recently. 

While making the rounds (i.e. Lowe’s, Dicks Sporting Goods, Sam’s Club, etc) on a cold and rainy Saturday morning in October, one of the guys at Sportsman’s Warehouse in Columbia turned me on to the Okuma brand.  Disregarding the fact that the company’s name for some reason began to conjure up images of Sea World’s newest feature whale, I decided to hear what this “salesman” had to say.

He was an older gentleman that clearly wasn’t trying to push me into buying anything – my kind of guy.  Within three minutes I realized that he knew what he was talking about (something you won’t find in many large retail stores these days) and he even convinced me to downgrade from purchasing a competitor’s reel that cost twice as much.  Well played sir. I shelled out the very reasonable $35 for the reel and paired it with a 7’ Lite Ugly Stick.  More on that model of Ugly Stick later.  
 
As it turns out, Okuma has an impressive track record of quality and a loyal following.  Just looking at the craftsmanship of the model that I purchased - the Avenger AV40a - had me wondering why I hadn’t tried one of these sooner.  Six ball bearing drive system, an included extra spool, and most notably, a super smooth drag had me also questioning the price tags that came with a few of my more expensive reels.

In addition, the company’s Hydro Block water tight drag seal is designed to keep water from corroding the drag system.  Because I am almost always fishing from a kayak, my equipment tends to get much wetter than the average angler fishing from a boat.  A few of my older reels have recently gone to die in a drawer in my garage because of drag failure from corrosion.  Time will tell if the sealed drag system actually holds up. 

Back in Virginia for Thanksgiving, I had a chance to wrestle with a handful of small Chesapeake Bay rockfish using this rig.  I must say, when the bigger fish started taking line, the drag was smooth - impressively smooth.  Almost any manufacturer can get the “reeling in” part right, but there is often a sharp contrast in how most reels react when a slab starts peeling off line, especially in this price range.  The Avenger AV40 gets high marks here and everywhere else for that matter. 

My testing phase is not over yet, but considering I tend to beat my equipment like a rented mule, this product has (so far) come out on the other side.  If you are in the market for a new spinning reel, whether you fish saltwater or fresh, you might want to take a look at the Avenger series.  For the price, I challenge you to find a better reel. 

- Paul Davis

Check out the online store at www.PalmettoKayakFishing.com

Tuesday, January 18, 2011

Winter in South Carolina

Photo Credit: Rachael Richardson (edited by Paul Davis)

We are only half way through January and like most of you, I’m already tired of winter.  The snow storm that hit South Carolina the other week made me realize (again) that less than 7% of the people in this fine state can drive in the snow.  Exhibit A – gas scooters are not a safe form of transportation on snow-packed roads.  Nothing against my fellow residents, I just call it like I see it.

Prior to the storm’s arrival, the local weatherman was calling for anywhere between 1-12 inches; that is quite a range I thought.  His predictions, that changed hourly, left me wondering if I too could get a job doing what he does as it seems like a pretty good gig. Then reality set in as I came to terms with the fact that I don’t have great hair like this guy, certainly a prerequisite for the position.

The news station proceeded to fire up its special winter storm theme music (new for 2011 I believe) that would make even Michael Bolton cringe.  Shortly thereafter a “storm team” or “snow crew TV 5” something-or-another logo came tearing across the screen and left me wondering if the reporters were going to announce that the world was about to end.  I love how the media attempts to instill fear in the general public in order to create a news story.

Being the guy who always likes to be prepared (considering the news has now actually convinced me that the world is going to end), I figured it was high time to stock up on an extra 12 pack of Budweiser.  If my years of schooling have taught me anything, it is that beer is an essential item to have during a snow storm…thank you Hampden-Sydney College and Matt Fontana.  After sliding on my boots I made my way out the door and to the strip mall down the road.  Judging from the looks of things in the parking lot, I knew what I was in for. 

Mind you, nothing has fallen from the sky just yet.  Nevertheless, grocery supplies at the local Bi-Lo had already hit DEFCON 2 levels by the time I got there. It was every man for himself. I watched from the fully stocked beer aisle as patrons tussled over the dwindling supply of milk and bread.  Who drinks that much milk anyway?

As I made my way out of the chaos with beef jerky, canned tuna and my 12 pack of red delicious in tow, I got a call from a friend in Charleston asking me about the weather.  He also let me know just how good the fishing had been down there over the past few weeks.“I caught 12 nice reds this morning”, he said.  That’s great I thought, as I reminded myself that I hadn’t had so much as a bite since late November. 


Photo Credit: Paul Davis

The snow/ice storm eventually came and passed with no major incidents to recount on my part.  I am happy to report that we didn’t run out of beer and we threw some bread out into the backyard for the birds even before the storm passed.  I know, we were living on the edge. 

Thankfully, work in the shop has kept me surprisingly busy too this time of year.  I guess everyone else that is trapped inside likes to shop on the internet as much as I do.  I hope that there will be no more snow storms this season.  As I sit here and write this, I am reassured by the fish mounted on the wall in the office that warmer times will be here soon enough and the fishing in my area will change for the better.  Until next winter.

- Paul

Monday, January 17, 2011

GoPro Hero HD Review

GoPro.com
GoPro Hero HD - reviewed by www.PalmettoKayakFishing.com

As a kayak fisherman, I’ve tested my share of waterproof cameras and video recorders over the past three years.  From Olympus’s line of waterproof digital point-and-shoots to Kodak’s PlaySport model (which looks more like a cell phone than a high definition recorder), I have become quite familiar with the ins-and-outs of waterproof offerings in the sub-$300 segment.   Like most consumers looking for a marine camera, my needs started off rather basic.  Affordability, ease of use, good picture quality, multiple mounting options and decent battery life rounded off the list of prerequisites.  The more I began to use these cameras on the water, the more my needs began to grow.  Self portrait timers became increasingly important for me in the kayak, which transitioned into a desire for a wireless remote.  Battery life became a pertinent issue with the models that I owned.  After purchasing the GoPro Hero HD about 2 months ago, I now realize how far ahead of the competition this unit is in the waterproof HD video market.  While I have yet to find one camera that “does it all”, when it comes to HD Video and exceptional battery life in a waterproof package, this camera delivers.

GoPro takes a very unique approach in its design.  At first glance, the Hero HD offers no real “wow” factor at all.  The first thing you will notice is it is small, very small.  Even when the camera is outfitted with its waterproof housing, it is about the size of a jar of baby food.  Speaking of GoPro’s waterproof capabilities, most cameras in this price range are rated to depths of less than 10 feet.  Even the highest end models max out at a depth of 30 feet.  GoPro’s camera is rated to 180 feet.  While my prescribed use will never come close to meeting these limits, this specification speaks volumes about the durability of the design.


Photo Credit: Paul Davis

The engineers built the GoPro to perform exceedingly well at a few major tasks instead of offering every option under the sun.  There is no LCD viewing screen on the back of the camera and only two buttons control all functions.  There is no zoom option, flash or any moving parts for that matter.  The lack of these features actually helps to make this camera perfect for its intended use – recording high quality HD video.  After a short (and necessary) session with the instruction it was quite easy to figure out how to use the multiple video and camera settings.

The full list of the technical specs can be found on GoPro’s website, but I want to touch on some of the highlights.  In addition to multiple formats of HD video (including 720p in 30 or 60 frames per second and 1080p) this camera is also capable of taking 5mp digital stills.  It is equipped with a wide angle lens that delivers an intriguing and useful “fisheye” effect for my application.  This design is perfect for kayak fishermen or other sports enthusiasts who want to capture a wide angle view of their experience while keeping the camera within reach.  

Various settings enable the user to create spectacular time lapse photo sessions while the lack of moving parts inside the camera make the GoPro Hero HD a strong contender for those of us who are less than gentle on our equipment.  Battery life is exceptional; the supplied rechargeable pack delivers well over 2 hours of recording time on just one charge.  This is field tested actual record time, not just manufacturer claims.

Did I mention the mounting options?!  The model I purchased was the GoPro Hero HD motorsports edition which comes supplied with so many interchangeable mounting parts, this camera can be affixed to just about anything.  From secure helmet mounts, flush mounts, rounded mounts and even a super strong, clamp-action suction cup arm that is designed for mounting to the outside of a racecar, there is a mount for about every application you can dream up.  The only thing I believe that GoPro left out in the included array of accessories was a tripod mount.  Thankfully it can be purchased separately for $8.  This accessory allows users to mount the camera to a tripod, monopod or anything with a protruding 1/4" diameter, 20 threads per inch bolt - perfect for DIY users like myself.


The one shortfall of this camera is sound quality – it certainly leaves something to be desired when mounted in the full waterproof housing.  Voices tend to sound “tinny” and somewhat muffled.  Any slight bump of the camera or mounting post is quite noticeable as well.  Nevertheless, the other strengths make up for these downfalls.  To be honest with you, I don't know how it would be possible to get better sound while maintaining the durable, watertight casing.  A cheap way to fix the sound issue is to purchase a digital MP3 voice recorder and add a lapel microphone.  The audio can easily be synced up to the recorded video during the editing process.

The GoPro Hero HD is a hands down winner and its no-nonsense design has proven to deliver professional looking video yet to be duplicated by any competitor in this price range.  The fisheye lens creates a dramatic effect in both video format and with photographs.  Unmatched battery life coupled with the standard SD card recording platform allow the user to just leave the camera rolling.  I highly recommend this camera and continue to find new uses for it on and off the water.

By Paul Davis

Subscribe to this blog for free and be sure to check out our online store at www.PalmettoKayakFishing.com - handcrafted kayak fishing gear and outdoor accessories.

Demo Video Clip from GoPro