
Sunday, December 18, 2011
DIY Scotty backing plates and install video
The video explains the whole process, but in classic PKF style, I supplied the part numbers and the retailers that sell the components used in this build. I built four of these round plates and the unit cost per disk comes out to be around a $1.30 each. With that being said, I did order my nuts and bolts in bulk so the breakdown was .18 cents per SS flange nut and .21 cents per SS pan head bolt after shipping. You can probably find these SS flange nuts at a more specialized hardware store to avoid ordering in bulk.
I was not able to find the 10-24 size of stainless steel flange nuts locally at any of the "big box" hardware stores so I ordered them through McMaster-Carr. They sell all kinds of bolts, screws, nuts, spring steel - you name it, they probably have it. Every time I have ordered anything from them, my package arrives on my doorstep the next day.
If you order online, shipping costs will not be calculated before you checkout. Just call them before ordering and they can give you a general idea of what will be charged to your credit card for shipping. My shipping costs have always been around $5 which is downright amazing considering the low retail prices and turnaround speed.
And just in case you were curious, I recently fabricated and installed rectangular backing plates for Scotty 244 flush mounts on a different kayak using the same method with equal success.
Fabricated Disk Parts:
8.5" x 11' Poly Cutting Board - $2.16, Walmart (Product page LINK)
Part Number 93776A391 Stainless Steel Serrated-Flange Hex Locknut, 10-24 thread size, 3/8" Width, 7/32 overall height, PACK OF 50 pieces - $6.55, McMaster-Carr (Product page LINK)
Other Parts:
Part Number 91772A249 Stainless Steel Pan Head Phillips Machine Screw, 10-24 Thread, 1-1/4" Length, PACK OF 50 pieces - $7.92, McMaster-Carr (Product page LINK)
Scotty 344 Round Flush Deck Mount Brackets - $9.99, Austin Kayak (Product page LINK)
Plumbers Goop - $4.57, Home Depot (Product page LINK)
Side note: The install procedure will probably also work with non-flush Scotty mounts where no large center hole will be drilled into the kayak. In this case, only the four mounting holes for the bolts will be drilled. To bypass this issue, attach a length of spring steel, bailing wire or something similar to both of the tag ends of the line with tape. Anything that has some weight to it (preferably magnetic) that can be taped to the line and will still pass through the mounting holes should work fine. Each end should look similar to a threaded needle, only the line is taped into place instead of passing through an eye hole. In the same manner as displayed in the video, pass the spring steel "needle" through the drilled bolt holes in the kayak deck. Only this time, just let the spring steel fall into the hull of the kayak. Attach a strong magnet to the end of a length of PVC and slide it through an open hatch toward the lines. The magnet will "grab" the spring steel and the lines can be fed through the kayak. Alternatively, use a piece of PVC with a hook attached to it to grab the ends of the string. The rest of the install process is the same.
Sony Vegas Movie Studio HD 11
After reading this blog post over at SaltyShores.com, I decided it was time to throw down some cash and purchase a better video editing program. Until now, all of my videos have been pieced together using Windows Movie Maker (yikes!) or a comparable program that came free with my Kodak PlaySport. While they both "worked", countless crashes and limited control of...well...everything, made these programs about as functional as using a hammer to chop down a tree.
When I discovered that Sam Root (unlike me, he is a pro) at SaltyShores.com was using Sony Vegas Movie Studio HD 11, I decided to go ahead and order the software. The $65 price tag makes Movie Studio HD very accessible to an amateur like me in a market riddled with video editing software north of $500.
The video below is the first project that I have pieced together using Movie Studio HD. The learning curve is surprisingly fast with this software and it is actually enjoyable to use. Most of the processes are intuitive and I have yet to run into any crashes or other hurdles that I encountered with the previous programs. While I have only scratched the surface with what Vegas Movie Studio HD can do, I highly recommend it to other kayak anglers that like to mess around with video. Now I just need to find some bigger fish.
Monday, November 21, 2011
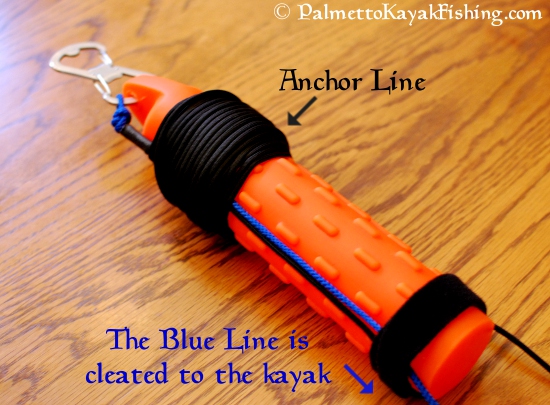
Quick release DIY kayak anchor system + bottle opener

Whether you prefer the store bought variation or some other form of anchor, having the ability to quickly disconnect from it is crucial when kayak fishing. Although not recommended, I often anchor in river current to get close to the fish I am targeting. Using this simple setup in conjunction with an anchor trolley, I can deploy as well as release my anchor in seconds.

The blaze orange dog training dummy from Remington is a cost effective, durable float that makes anchor retrieval a cinch. Nite Ize’s stainless steel “S-Biner AHHH…” carabineer serves as a sturdy anchor line holder and doubles as a bottle opener back at camp. If experience has taught me anything, it is that you can never have enough bottle openers.


Key Components:


Velcro Strip – I recommend and use Velcro’s “One Wrap” 7/8”X 23” straps as they work well even when soaked. A 3 Pack is around $4 at HardwareandTools.com and they are also available at select hardware stores and Walmart.
10’-14' section of cord, preferably a different color than the anchor line. Home Depot and Lowe’s sell 75’ length packs of 5/32” diameter cord for less than $3.
Length of anchor line and anchor of your choice.
Start off by securing the “S-Biner AHHH…” to the vinyl dummy as pictured.

Take the 10’ - 14' length of cord and make a small loop in one end that will fit over the “S-Biner AHHH…” Attach and position the cord against the dummy as pictured and secure it with one of the Velcro straps at the top. This setup allows the pressure exerted from the anchor line to pass around the vinyl dummy instead of through it.


Tie the end of the anchor line to the 10’ length of cord as pictured and tuck the knot under the Velcro.

Wind the anchor line around the dummy to take up the slack. Use one of the extra strips of Velcro to keep the wrapped anchor line secure on the dummy.
Lastly, clip the “Figure 9 Carabiner” to the side handle of the kayak or similar location that is out of the way yet easy to reach. On the setup on my 2012 Ride 135, I use this carabineer to control the anchor trolley line and keep it from riding up. It can be easily removed in seconds for full front-to-back operation of the anchor trolley if desired. 95% of the time I have the anchor trolley in the forward position anyway.

To use this setup, slide the blue cord through the ring of the anchor trolley.

Leave a foot or so of excess line free on the tag end and secure it to the “Figure 9 Carabiner” as noted in the manufacturer’s instructions. This allows the anchor trolley to be placed in the desired position before the anchor is deployed.
Leave a foot or so of excess line free on the tag end and secure it to the “Figure 9 Carabiner” as noted in the manufacturer’s instructions. This allows the anchor trolley to be placed in the desired position before the anchor is deployed.
Unwind the anchor line from the dummy and drop the anchor over the side. When the desired length of line has been let out, simply wrap the anchor line around the “S-Biner AHHH…” carabineer 4 times - two wraps between each opening as pictured.


It only takes a couple of seconds to accomplish and creates a non-slip, yet easy to remove connection. Toss the dummy into the water and get ready to fish. The location of vinyl dummy in can be adjusted by simply taking up or letting the slack out of the “Figure 9 Carabiner” line.


It only takes a couple of seconds to accomplish and creates a non-slip, yet easy to remove connection. Toss the dummy into the water and get ready to fish. The location of vinyl dummy in can be adjusted by simply taking up or letting the slack out of the “Figure 9 Carabiner” line.
To come off the anchor, simply yank the tag end of the line connected to the “Figure 9 Carabiner”. The line will slide right out of the entire assembly. The blaze orange Remington float will be easy to spot when you return to retrieve your anchor. Tight lines - Paul
Note: If you need a beefier setup, upgrade to Remington's 3" x 12" training dummy that runs $6.99. Switch out the small “Figure 9 Carabiner” for the larger sized one that costs around $6. These substitutions will allow for much larger diameter ropes and a heavy duty setup if needed.
Tuesday, November 8, 2011
Cold Weather Kayak Fishing Gear on a Budget
 |
| Saluda River trout fishing last winter |
It was just two weeks ago that I was kayak fishing on the Congaree River in Columbia, occasionally wading through the shallow sections in the 68 degree water. Dressed in my normal summer fishing attire of shorts and Tevas, I soaked up what would become one of the last warm weather days of the season. While the river was a little on the chilly side, the combination of the water and air temperatures was well above the 120 degree mark where things start to get dicey. It is an easy calculation– simply add the water temperature to the air temperature. If this number dips below 120 degrees, the right combination of clothes becomes critical.
I'll assume every kayak angler reading this uses a PFD. While I recommend you wear it all the time, without fail, keep it on during the winter season. I don't think I need to elaborate on why this is crucial in cold water.
For a base layer, I prefer light polyester, capilene or polypropylene long john-style pants. I stay away from standard long johns that tend to be on the bulky side. I use the Terramar brand of thermal base layer pants that sell for $6.99 at Rugged Warehouse in Columbia. They are constructed of high quality 100% polypropylene and have a nice thin design. Whatever you end up purchasing, be sure to read the label and don't buy blends that contain cotton.
 |
| Marmot wool/fleece hat - $9, FTP 80/20 polyester/spandex compression shirt - $5, Terramar 100% poylpro pants - $7 |
I look for the same materials in the long sleeve shirts I use for my torso base layer. Many folks may already own these style shirts for summertime fishing to block UV rays and stay cool. The purpose of this layer is to wick sweat away from the skin. Again, outfitters like Rugged Warehouse offer these shirts from a variety of different manufacturers at deep discounts. While RW's inventory changes all the time, I can usually find what I need. I picked up a few extra FTP brand long sleeve compression shirts (80% polyester, 20% spandex) this past weekend for just $4.99 each.
 |
| Source: Dick's Sporting Goods - $59.99 Caddis Neoprene Waders |
Caddis Neoprene Chest Waders are available online from Dicks Sporting Goods and make up the key component of my outerwear. At around $60, the price is right and they come in tall sizes as well. I have been using these same waders for over 2 years now. They are durable and quite warm thanks to the 3.5-mm thick neoprene. Although the product picture can be deceiving, these waders are fully footed, waterproof and sealed. Purchase the most inexpensive pair of wading shoes you can find. After all, you'll be sitting down in the kayak and secure footing on riverbed rocks isn't exactly an issue.
I wear an inexpensive ($20) but warm fleece jacket and keep a spare in a waterproof bag in my hatch. To keep the wind and rain at bay, buy a quality 100% waterproof and breathable unlined jacket shell. Outfitters like Sierra Trading Post (take advantage of the coupon codes that are always available) and even Eddie Bauer will offer Gore-Tex like material at low cost. Watch for seasonal sales especially through Eddie Bauer. I use one of EB's "WeatherEdge" jackets for kayak fishing and paid less than $30 for the waterproof/breathable shell that has held up and performed as well as Gore-Tex.
 |
| Eddie Bauer WeatherEdge waterproof/breathable shell - $30, spring clearance sale |
Lastly, make sure you have a quality wool or fleece hat. The great thing about both of these materials is that they insulate even if they get wet. I wear a Marmot wool/fleece blend hat that I picked up at a clothing discount store last year for $9. When it comes to keeping hands warm, I have found that waterproof Neoprene gloves work the best for me. They don't absorb water and insulate well. I've been using the same pair of Remington neoprene gloves for over 12 years now and they are still going strong. If you need extra layers, stick to the basics I have pointed out here. I'll sometimes add an Adidas ClimaLite pullover (clearance section, T.J. Maxx $9) into the mix if I need it. A number of lightweight layers that can be peeled off or put back on as conditions change make all the difference in the world when managing comfort.
This guide should serve as a starting point, simply adjust layers according to your specific needs. Just remember, dress and prepare as though you plan on taking a swim and be sure you are skilled enough to get back into your kayak in case things go south. I have practiced deep water kayak reentry in the summer months wearing waders and a base layer just to make sure I could succeed without issue. If you have any doubt in your abilities, wait until it warms up.
Another good idea is to throw a backup set of clothes in a dry bag so that you are prepared for the worst. When I head out on the Chesapeake Bay, things become a little more extreme than the more urban kayak fishing I do in Columbia. In addition to the extra clothes, I toss in a couple of Pop Tarts, a waterproof/windproof jet style butane lighter, a roll of toilet paper and a tube of alcohol-based hand sanitizer into the dry bag. The last three items will get a fire started quickly even in the most adverse conditions.
Friday, September 30, 2011
Deluxe DIY Kayak Bait Well with Light
Although I don't usually fish with live bait, it is hard to ignore the action that live herring can generate this time of year on Lake Murray when targeting stripers. On a handful of occasions I have used a simple Frabill aerator in combination with a small cooler to get the job done. The whole apparatus fits in the tankwell of my kayak, but this setup is far from ideal. The aerator is an inefficient power hog (remembering to purchase D batteries every trip gets old) and the durability is just not there. This may be satisfactory for one season of fishing with minnows, but I wanted something for the long haul that would do a better job of keeping the herring alive. In addition, an insulated container (i.e. cooler) is a must with the summer heat we have in SC.
Commercially available versions of kayak bait wells gave me sticker shock considering the key components include nothing more than a power source, a low volume bilge pump and a watertight container of some sort. Finish it off with a couple of rod holders and handles and there really isn’t much to it.
If you aren’t into the DIY stuff, then check out Hobie’s Kayak Live Well for around $300. Pick up an inexpensive waterproof Nano Spotter light from PKF’s online store and you can get the same lighting result as this DIY version. I give the designers at Hobie a thumbs up as the ergonomic design is quite nice. If you want to save over $200 though, keep reading.
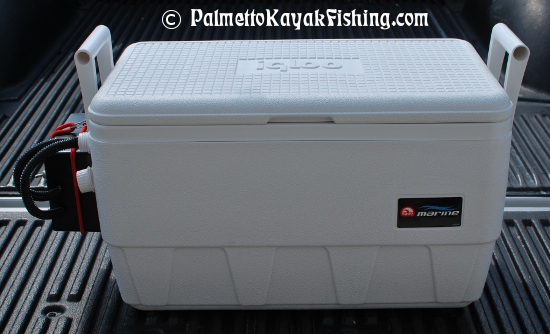
Let me start by saying that this DIY bait well write up should serve as a general guide and that the principals and components used can be interchanged with a cooler or other parts you may already have on hand . If you decide to purchase the same Igloo cooler that I used in this build, all the measurements and parts listed below will match up with the pictures, minus the added light. I made everything removable so that I could use this cooler for other purposes.

Hardwiring the LED light was the most tedious task of this entire build. I knew it was going to be a pain soldering wires to the leads on the small circuit board that controls the LEDs. I chose to showcase what is possible if you wanted to take this project a little further. At the end of this build, I will teach you how to get the same lighting results without the headache and added cost of hardwiring the waterproof light.
Basic Parts List:
Standard Cooler (for this build, I chose Igloo’s 36 quartMarine Cooler - $22
6 Volt 10 AH Sealed Lead Acid Battery ($17.95 shipped from this Ebay Seller who stocks them regularly as of 9/2011)
Radio Shack’s Project Enclosure (7x5x3”) - $6.50
1 – Radio Shack Toggle Switch - $3.50 (Currently waiting on a delivery of 2 screw on rubber marine toggle covers, $2 Ebay)
Igloo 24011 Replacement Drain Plug - $4 (to pass wires through the cooler wall)
4 feet of marine bungee -$5
Hopkins 12 in. 2 pole flat set connector from Autozone $2 (part number: 47965)
1 - Nite Ize S biner, size 2 - $2
2 – suction cup wreath hangers $1.50 each (locally in the Columbia area at “Carolina Pottery”)
Large Zip Ties
Length of ½” Sched 40 PVC pipe, 2 – 90 degree PVC elbows, 1 – PVC cap, 1 – PVC threaded to slip adapter
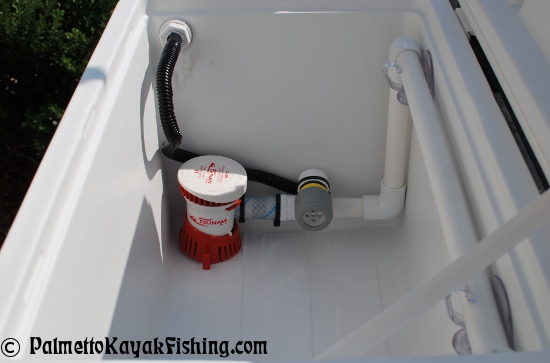
2” long section of any ¾” inner diameter hose to make connection from bilge pump outlet to PVC threaded adaptor (see picture)
1 – NANO Spotter Light package WITHOUT base - $12.99 from PalmettoKayakFishing.com
Start by cutting the ½” PVC pipe to the following lengths:
A) 3 ¾“
B) 6 ½“
C) 16 ½“
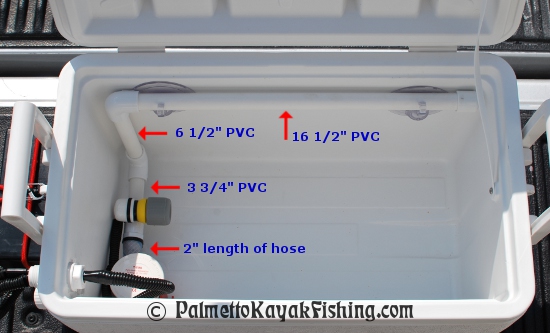
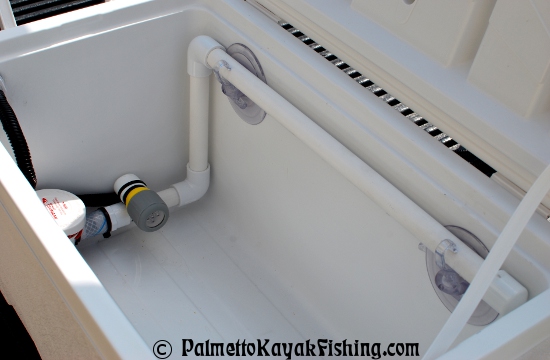
Drill 5 holes in the long horizontal PVC pipe and assemble as pictured. I did not use PVC glue on these pieces as the friction holds them together just fine and makes breaking everything down for storage much easier. Firmly seat one end of the ¾“inner diameter hose onto the output of the bilge pump and the other end to the threaded section of the ½“ PVC adapter. Secure the hose in place with large zip ties.


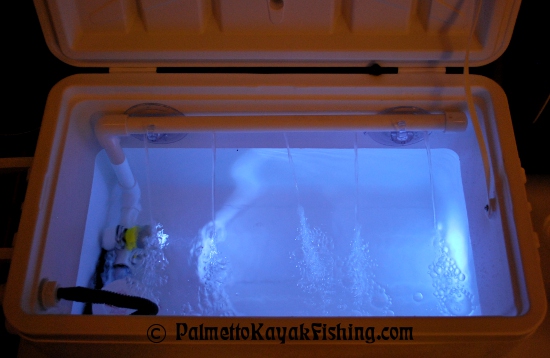
Reposition the plastic wreath hooks to the suction cups as pictured. Press both suctions in place and slide the horizontal PVC tube in place – you will hear it “click” once it is properly seated on the suction cup clips.

The 6 volt SLA battery was chosen so that the force of the streams of water wouldn’t injure the baitfish. The bilge pump (rated for 500 GPH at 12 volts) now circulates 250 GPH with the 6 volt battery. This setup is more than enough to keep the herring happy and makes hardwiring the Nano Spotter light (also 6 volts) possible.

After drilling holes, installing the switches, running/soldering wires, sealing everything with Goop, etc., I wedged some scrap foam around the battery inside the box to keep it from moving. I used some left over “Duct Seal” to make a gasket to seal the plastic project box door once it was installed and screwed in place. This step ensures a watertight housing, yet allows the battery to be accessed if needed. Once the rubber marine toggle covers get delivered they will be installed to protect the switches from water damage. I have used it as pictured in fresh water with no issues so far, but think that this step is important for long term durability.

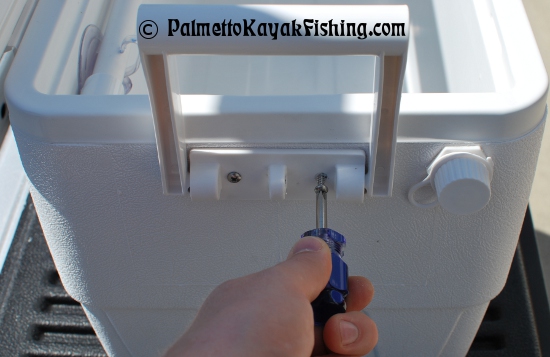
The black project box from Radio Shack comes with two rear doors - one is plastic and one is thin aluminum. Use a hacksaw or other tool to shape the aluminum plate as noted in the picture. Drill the proper sized holes in the thin aluminum sheet in order to mount it to the cooler using the existing screws. Bore out the two bottom holes large enough to pass the bungee cord through. I just knotted the ends of the bungee cord that pass through these holes.


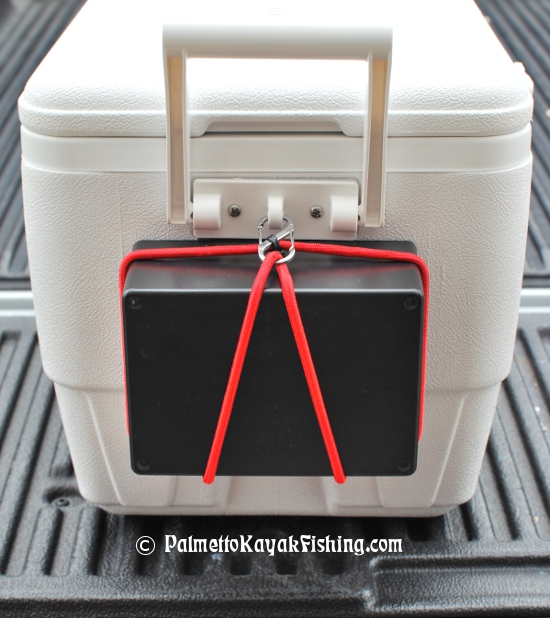
Once the plate is installed, assemble and zip tie the two pieces of bungee cord as pictured and attach the S biner. This setup secures the battery box quite nicely. Use a hole saw drill bit to carefully bore a hole through the top corner of the cooler below the lid. Be sure to keep pressure on the opposite side of the cooler wall with a scrap piece of lumber so the bit actually cuts a hole instead of cracking the inside wall. (I drilled through the outside wall first, carefully cut away the foam on the inside, then reinserted the bit while pressing a block against the inner wall.)


Install the replacement drain and seal liberally with Goop. Now you have a nice, clean connection sleeve for the 2 pole flat connectors. When the cooler is not being used for bait, the drain cap can be screwed back on.


I charge the 6 volt SLA battery with this 6 volt charger from Walmart. Instead of taking the battery out of the sealed box, just attach the charger’s alligator clips to the proper +/- connections on the 2 pole connector and flip the toggle switch on the project box to the “on” position to open up the circuit.

In order to hard-wire the Nano Spotter, I cut the flashlight with a hacksaw as pictured. I then molded an end cap to fit securely over the exposed portion, drilled a hole in the cap and passed the wires through the flashlight body. Next, I carefully soldered the wires to the positive and negative leads on the circuit board of the light. A liberal amount of Goop was used to seal the end cap and the hole drilled for the wires. I reassembled the flashlight head and left it in the "on" position, allowing the additional toggle switch to control the on/off settings remotely. The rest is pretty self-explanatory – if you need an explanation on the basics of wiring up the connectors (w/o a switch) see the pictures on the Battery Box Blog Post HERE.


You can get the same lighting result by just using the Nano Spotter without modifying it. 4 AAA batteries deliver 60 hours of run time and the waterproof flashlight can be zip tied to any of the PVC parts, either under the waterline or above. A twist of the rubber flashlight head is all it takes to turn this light on and off. In fact, if you attach the supplied diffusion cone on the light, it will float and it can be turned on and just be tossed in the bait well. Whatever route you take, the light option makes it so easy to net the baitfish in low light conditions. The Nano Spotter packages include the 4 colored disks as pictured here to change the color output if desired.
 |
| Available at Palmetto Kayak Fishing's Online Store - Click HERE |
This bait well is solid and I have experienced great results from the battery. So far during the testing phase, I left both the battery and the light on for over 3 hours and it was still going strong. Herring also hold up quite well in there as I have noticed far fewer casualties compared to my previous setup. Lastly, I only fill the cooler up with water about a 1/3 of the way full which keeps the center of gravity of the bait well somewhat low in the back of my kayak. It is very manageable on the water and the light function is an much appreciated addition.
Enjoy! - Paul
Enjoy! - Paul
 |


Subscribe to:
Posts (Atom)